However, unless your current Facebook friends have the patience of saints (my don't - drunken confessions have informed me that I'm on quite a few blocked lists ...!) then you'll want to set up a separate page for your author name, your series, or even a major character. While your friends and family might be a good place to start in the hunt for fans and sales, they'll quickly get bored of hearing about it ... All. The. Time. Creating a separate Facebook page allows real fans to come to you without you resorting to annoying those close to you with endless posts about your books.
And it's easy as pie to do. Here I'll demonstrate while setting up a Facebook page for my latest alter-ego, village cricket short story writer, Michael White.
First of all, log in to Facebook and then go to this link to select the type of page you want to set up.
You can choose whatever type you want but for an author it's probably best to go with public figure.
Click on Choose a Category and you'll see Author in the drop down menu.
Now, give your page a name (I went with the wonderfully clunky Michael White Cricket Fiction Writer, check the terms box and then click Get Started.
Next you come to the screen below which asks for a few details.
Here you also have the option to add a external blog, website or Twitter account if you have one. For the question at the bottom I check "no" because Michael White is a pen name. I think this box is for fan sites for celebrities, but if you are the person in question then it's perfectly okay to check "yes".
When you're done, click Save Info.
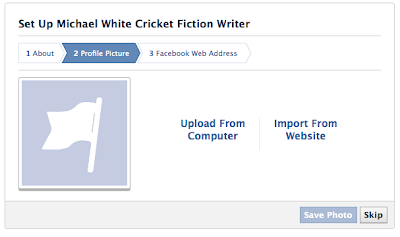
You'll come to this page.
You can choose whether to add a profile picture now or later. I added a stock photo of a cricket pitch which I bought for the covers of Michael White's short stories. You can change your profile pic anytime, though. When you're done, click Save Photo or Skip to go to the next page.
The next screen gives you the option to choose the Facebook address for your page. This is the link you can use in your books to send people to your Facebook page.
I went with the one they suggested. When you're happy with it, click Set Address.
You'll be taken to your completed page.
Facebook will automatically highlight the Like button so you can be the first person to like your page, and then the area where you can invite your friends to like it.
You're finished! Now all you have to do is add stuff to your page, share it to get Likes and start posting. If you're ready for something a little more complicated, you can set up an Amazon Store for your books in the toolbar. Click here for my guide to doing it.
See, told you it was easy. Enjoy!
Any questions or comments are welcome in the comments section below. And if anyone wants to give Michael White's brand new page some love, here's the link.
Chris Ward
June 23rd 2013


Thanks for the easy instructions! I've been meaning to do this forever.
ReplyDeleteNo worries, Deb, glad you found it useful! Any questions please let me know.
Delete